OAuth 2.0 Integration with one.id
Learn how to quickly and securely request user data on by integrating the OAuth flow into your web applications
Overview
uses the OAuth 2.0 protocol to provide secure access to user data. This documentation will guide you through the steps to implement OAuth 2.0 in your application.
In the OAuth flow, the Scope is used to limit an application's access to a user's account.
With , you define what data you are requesting by creating a contract. Think of the contract as an online form where you collect user information, such as First Name, Email, Address, etc. The contract is deployed on the blockchain, ensuring transparency, security and re-useability.
The contract address is then used as the scope in the OAuth process, defining the permissions and data access you are requesting.
Getting Started
Integrating the OAuth 2.0 flow is quick and provides a greater level of flexibility when managing your user accounts once you are a registered OAuth Client on .
Registering Your Application
To get started, your application must have an account with to obtain your client credentials.
You can then use the following contract issued by to obtain your client_secret.
client_secret! Ensure the Homepage URL key has been created in your Vault.
Once redirected, you can log in to retrieve your client_secret from your application's Vault.
Create a Contract [SCOPE]
Once you've registered your application, you can define what data you want to access from the user's account by creating a contract.
To create a contract, go to your Contract Dashboard and Create Request.
Create a contract that specifies the data fields you want to request access to. For example, if you want to request access to the user's First Name and Email, and you want to create your own ID on behalf of the user, your contract might look like this:
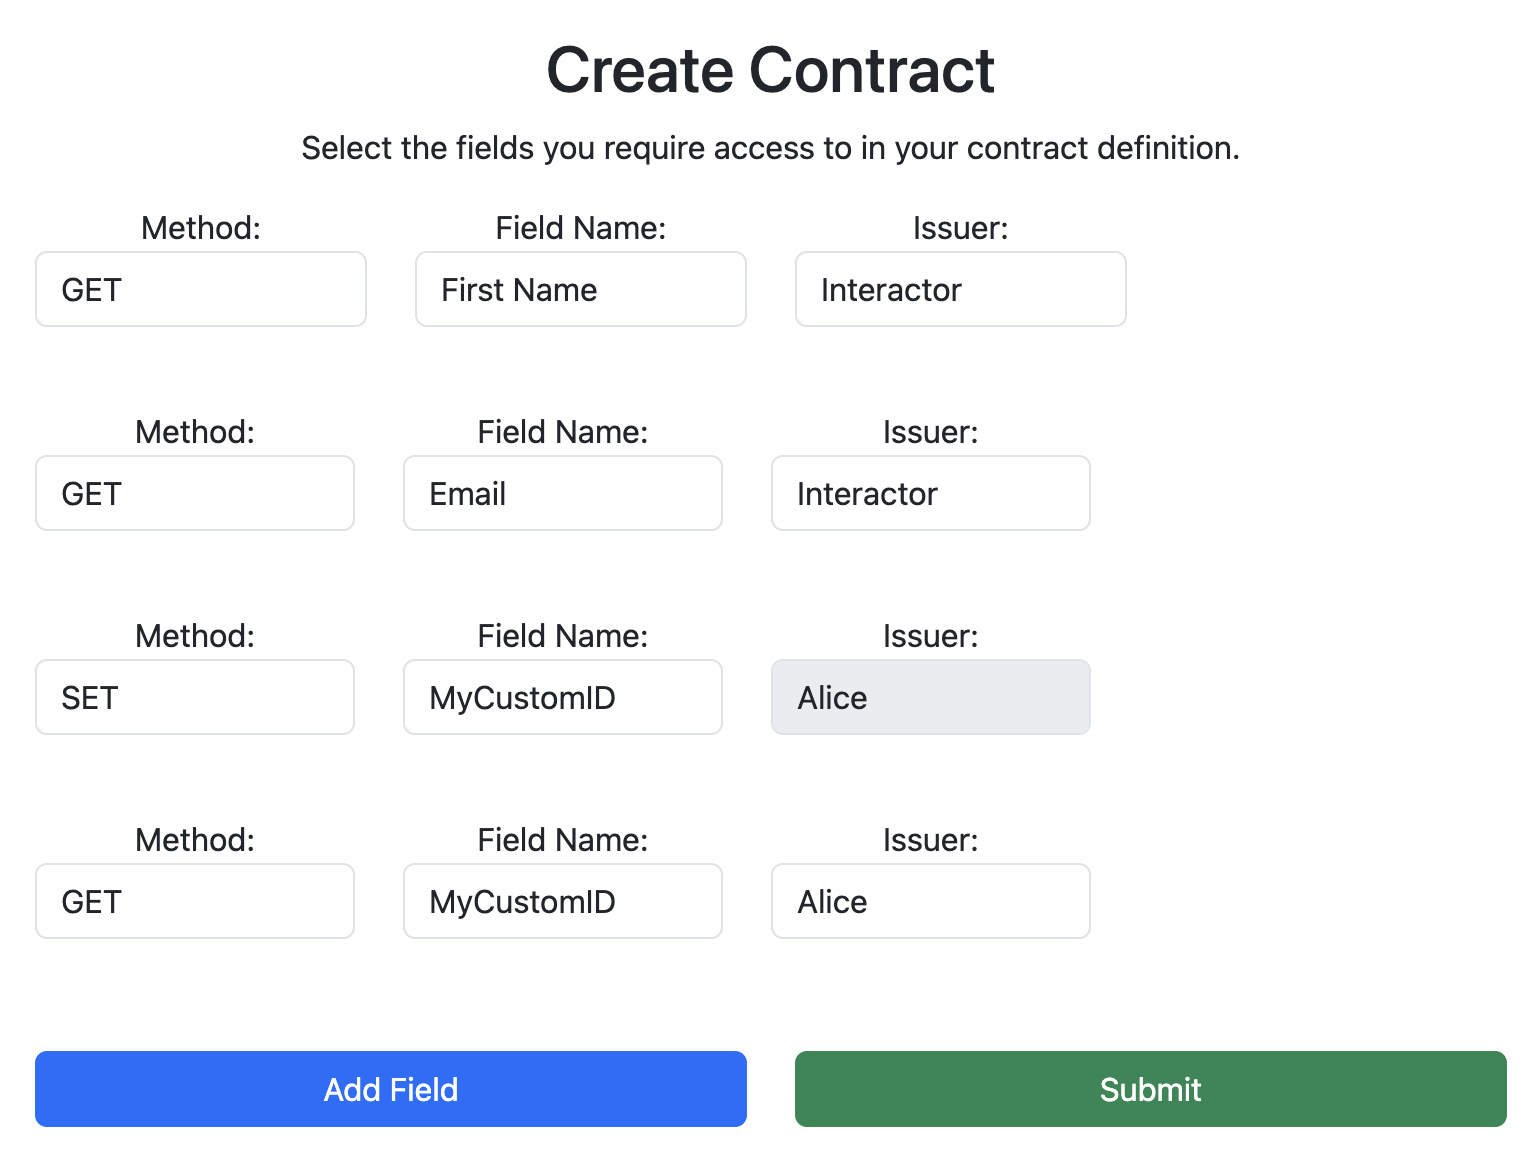
The contract address can be found in the Contract Dashboard and will later serve as the [SCOPE] parameter.
Configure the Authorization Object using HTML and JavaScript
Once you have the contract created you can quickly setup the authorization object on your page.
Configure your authorization object by setting the meta tags in your HTML <head> section and include a div in the <body> where you want to to display a button.
<!DOCTYPE html>
<html>
    <head>
        <meta name="oneid-signin-client-id" content=[CLIENT_ADDRESS]>
        <meta name="oneid-signin-scope" content=[CONTRACT_ADDRESS]>
        <meta name="oneid-signin-redirect-uri" content=[REDIRECT_URI]>
        <meta name="oneid-signin-state" content=[STATE]>
        <meta name="oneid-signin-nonce" content=[NONCE]>
        <link rel="stylesheet" href="https://getoneid.com/static/oneid/oneid.auth.css">
    </head>
    <body>
        <div id="oneid-signin"></div>
        <script src="https://getoneid.com/static/oneid/oneid.auth.js"></script>
    </body>
</html>
-
<[CLIENT_ADDRESS]>: Your 'Blockchain Address', found in Settings. -
<[CONTRACT_ADDRESS]>: The contract address you saved from the previous section. -
<[REDIRECT_URI]>: The URI to which the authorization redirects (It must include a domain name). -
<[STATE]>: The current state of the request. -
<[NONCE]>: The value that associates a client session and an ID token.
With the included CSS, a button will appear on your page that should look like this:
Handling the Authentication Response
After the user clicks the button, a popup opens transparently showing the user what grants are being requested.
Once the user authorizes and grants the requested permissions the authorization request is sent to where it is processed and if successful a HTTP POST request containing the results of the authorization as parameters in the body is sent to the the URI provided in [REDIRECT_URI]. The user is also redirected to [REDIRECT_URI]
A successful request contains the following parameters as part of the request body:
-
code: A single-use authentication code that expires after 10 minutes. See below to learn how to use this token. -
user: A unique identifier for the user. -
state: An arbitrary string representing the current state of the authorization request. You should validate this value agains the one passed in to mitigate corss-site request forgery attacks. -
nonce: Similar tostate, it should be validated by the third-party to ensure it has not changed.
Auth REST API
Token endpoint
The token endpoint let's you exchange an authentication code for an authentication token.
Endpoint
POST https://getoneid.com/api/auth/token/HTTP Body
-
grant_type: For authorization code validation, useauthorization_code. For refresh token validation requests, userefresh_token. -
code: Single use authentication or refresh token. -
client_id: Your 'Blockchain Address', found in Settings. -
client_secret: Your secret identifier issued to you by one.id. -
redirect_uri: The destination URI must match the one initially provided as part of the authentication.
Response Codes
-
200: OK, returns:-
access_token: Single use token used to access the user data requested. It lasts for one hour. -
token_type: "Bearer" -
expires_in: 3600 -
refresh_token: Refresh token used to grant a new access_token when required.
-
-
400: Server was not able to process the request.
GET Data Endpoint
Request user data using an access_token.
Endpoint
GET https://getoneid.com/api/auth/userinfo/get/HTTP Header
-
Authorization: "Bearer {access_token}"
Response Codes
-
200: OK, returns:- Requested Data as JSON.
-
400: Server was not able to process the request.
SET Data Endpoint
Modify user data using an access_token.
Endpoint
POST https://getoneid.com/api/auth/userinfo/set/HTTP Header
-
Authorization: "Bearer {access_token}"
HTTP Body
JSON object containing the Key's and Values you are modifying for the User.
Response Codes
-
200: OK, Values set successfully. -
400: Server was not able to process the request or auth code expired. -
401: Authorization header missing or invalid token. -
403: Permission Error. The User has revoked grants.